Tag Archive | diy

DIY Days: All Natural Bleach

Hey y’all! Jenn here with a new DIY Day. Today’s topic is All Natural Bleach.

I found this on Pinterest months ago and couldn’t wait to try it! Well I finally ran out of my store brand bleach a little over a month ago and was sooo excited to get to make this and I am loving it!

It is a super simple recipe and very cheap to make!

All you need is water, lemon juice, peroxide, a measuring cup, and a storage container.

The recipe is:
12 cups of water
1/4 cup of lemon juice
1 cup of hydrogen peroxide

Mix together and use 2 cups per load of laundry.

See super simple and my daughter loves to help with the pouring!

I put mine in an old laundry detergent bottle (if you don’t have one just ask your friends, mine always come through when I ask for random things like empty laundry bottles or milk jugs) and I have an old measuring cup that I keep on my dryer to use for measuring.

20131016-215536.jpg

I make a double batch when I make mine because it is so easy and I have the storage for it.

The blog I got this recipe from has more pics (sorry I had to get a new phone and all my pics are now stored somewhere else). But you can check out her blog here: All Natural Bleach Alternative

Well I hope you enjoy this!

Until next time,
Jennifer

DIY Days: Make Your Own Reusable Mop Cloths

Hola all! Jenn here with a new DIY day!!

Last summer I started to get tired of using a Swiffer to clean my hardwood floors. I was using the one with the throw away wet pads and it was getting out of hand how many I went through in a week. I mean seriously, it took 2 for the living room, 2 for the kitchen, 2 for the dining room, then 1 for each bedroom and bathroom! What!! That was ALOT of money each week!

So I checked out the spray mops at Wal-Mart and ended up buying a Cedar O brand spray mop. I don’t remember the price now, but it has been totally worth it! It has a convent jug that you put your cleaner in, then spray the trigger, wipe up, take off the reusable pad, wash it, move on! I loved it! I felt like I was saving money each time I mopped!! (And once I switched to mopping with vinegar and water=$$$$)

20130706-224432.jpg

Then I reached a downside, my mop as starting to leave streaks on my hardwood floors….NO! Well I started trying different things and realized the problem was my mop pad. Even though it was getting washed it seemed to have a film on it…..I blame the chemicals I used to use 😉 Well on my next Wal-Mart trip I looked at replacement pads, they were $7!! No thanks! I have a lot of floors to mop, that was not happening. So I made do with what I had and used dish towels.

Well, one day as I was going through boxes I found old baby towels and old cloth diapers (the best burp clothes!). So I used clothespins to put them on my mop and to my surprise they worked great! No streaks!!

20130706-225724.jpg

But it is hard to mop with clothespins holding your cloth on so I made them into cloths that would fit my mop. This was so simple anyone can do it!

First I laid out the cloth, put my mop on it, drew a line with a sharpie to tell me where to cut-you want to make it big enough to fold over and go into the little holes on top of the mop-

20130706-224943.jpg

20130706-224958.jpg

Then you just sew up the edges so it doesn’t fall apart! Easy Peasy!

20130706-225105.jpg

I use the first one I made as a template for cutting out the next. I double layered the baby towels since they are thin. Now I have 4 new mop cloths that cost me nothing but some time, way better than spending $28 on new ones 🙂

20130706-225345.jpg

And my little girl loved it! She got to push the pedal for one whole cloth. She was so excited because she sewed!!

20130706-225432.jpg

I have used these a few times now and they are working great! I just bleach them after each use and they are ready to go next time!!

Well I hope you enjoyed this DIY day and that it is helpful to you!!

Don’t forget to do something to make someone smile today!

Love
Jennifer

DIY Days: Ditch the paper, Use cloth

Hola all! Jenn here with a new DIY day!

Today’s topic is: Ditch the paper, use cloth!

If you are like me you have become painfully aware of how many rolls of paper towels your house goes through in such a short period of time. It was truly nagging at me.

Saving money has not been easy for me….well I guess that is better stated finding ways to decease spending has been hard for me. One of the things I noticed was how many paper towels we were using, I was going through an alarming amount! Between using them for cleaning, using them at meals, and using them to wipe up messes….it was ridiculous! I talked to my hubby about it and told him I wanted to switch to using cloth for cleaning and meals which lets face it, he’s a guy…he doesn’t really care.

I happened upon a dollar store that was going out of business where I found packs of washcloths which were only 0.75 each. I instantly bought them and started using them for my cleaning. At another dollar store I found the purple cloths in the picture below. They are more absorbent and more abrasive (they those “super” absorbent cloths). I prefer to use them on the toilet, and eventually will switch to using just those on everything as I buy more. They were 2 for $1.00.

20130626-000240.jpg

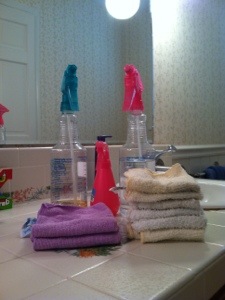
I LOVE it! It takes a little more wiping because they do not absorb like paper towels, but I have found it totally worth it! I use the same one to clean both bathroom mirrors, then one for each vanity, and one for each toilet. I use one rag for dusting which I can use 3-4 times before it needs washing. Once they have been used I just simply wash them with my whites so they get bleached 🙂

I found 4 pack of cloth napkins at the goodwill for less than $1.00 (sorry I don’t remember the exact amount). Then when talking to a woman about my new endeavor, she said she had some cloth napkins she didn’t use so she gave me 6! They do not always get very “used” at meals, so I can reuse them, sometimes…..depends on the meal. Once they are dirty I just simply wash them! Added bonus is they look nice on my table!!

-I still use paper towels for cleaning my granite countertops because I found the rags streaked them.

Let me tell you, within a month of using cloth I could tell how much less we used paper towels! I was so excited! A 6 pack roll of paper towels lasted us over 6 months!! I average less than one roll a month…..that is a huge difference than when I was using them to clean both bathrooms, dust, and for meals!

I have never been a fan of using paper plates for everyday meals, I always thought that was a waste of money. (Yes I know not having to wash dishes is nice, but how cost effective?) So I have never done that, but if you do I would suggest looking at how much you spend, compared to a little extra time washing or loading the dishwasher.

So if you are tired of having to use paper towels and tired of the frustration of realizing you are out….ditch the paper and switch to cloth! Your bank account and the environment will thank you!

**EEEKKKK I have to add I recently found DIY reusable fabric papertowles on Pinterest! They are fabric and you can use snaps or Velcro to fasten them together and you roll them around an empty paper towel tube and stick them on your paper towel dispenser……so excited!! Can hardly wait to try making these!

Don’t forget to do something to make some smile today!!

Until next time,
Jennifer

DIY Days: Coconut Oil Lotion

Hola all! Jenn here with a new DIY Day!!

So I love DIY things and I have developed a new found love of things all natural, organic, free of pesticides, free of a gazillion different chemicals, things simply made from “what God gives us” well imagine my surprise to see a blog post on using coconut oil as lotion, and the woman mentioned reading the back of a bottle of lotion. Well I went and read the back of a bottle, then another, then another…..I had a strong Bath and Body Works addiction so I had LOTS of reading material. There were so many ingredients in them it was scary!!

So I immediately went back to the post on using coconut oil to see what I needed. I was shocked to see I only needed a jar of coconut oil. Well, that was simple enough. So on my next shopping trip I was determined to buy a jar and try it out. I was alarmed at how expensive it was…..that was a lot of money for something I wasn’t sure I would like!! Then I remembered a $5 Kroger coupon I had so I went there and got a jar and only ended up spending $1! Score for cheap!!

I started using it right away as my lotion. I would just scoop some out of the jar and rub it right on my skin. It made my skin feel so smooth! I was in love. The only downside was the greasy feeling it left afterwards.

I started looking online more and found a site where a woman mixed her coconut oil with vitamin e and she really liked it. So I decided to give that a try. I think this made it a little better consistency for rubbing in. You can view her post here: http://www.littlehouseliving.com/homemade-coconut-oil-lotion.html

I have to say I LOVE this lotion. It takes some time to get used to the initial greasy feeling, but I have been using this oil, in some form, since march and I don’t notice the greasy feeling anymore. It is not the best when it comes to a hand lotion, I use it….but I use others to. I am hoping to find a natural hand lotion solution, so if you have any suggestions let me know!

I also use this lotion on my daughter. She loves that we made it and that she gets to scoop it out of a mason jar with her finger. I love that I am using something on her that is all natural and it has helped clear up her skin. She is prone to eczema (slight) and heat bumps, since using this lotion her skin is clear 🙂

If you are looking for an all natural lotion alternative, I recommend trying out coconut oil!

You can go online and read tons of other uses for coconut oil and the benefits of using it.

Hope this helps you in some way!!

Don’t forget to do something to make someone smile today!

Love
Jennifer

DIY Days: Getting Urine Stains out of a Matress

Hola y’all! Jenn here with another DIY day!

Today is a kind of gross topic, but if you have children or pets you will understand and appreciate this. Getting urine stains out of a mattress. I ran across this on Pinterest one day and instantly pinned it. We tried it one day and I was AMAZED at how well it worked.

You only need simple ingredients that you probably have have around your house, especially if you have been getting into more DIY cleaners.

You will need a measuring cup, tablespoon, funnel, and spray bottle.

8 ounces of hydrogen peroxide
3 tablespoons of baking soda
1 drop of liquid hand dish washing soap (I used the blue Dawn)

Mix all ingredients into the spray bottle and use within 20 minutes. Spray it onto the stains. You should see the stain lift and disappear within 5-10 minutes. Once the mattress dries, if a baking side film remains, then simply wipe or vacuum it off.

*Per the blog I found this on:
You can not store the leftover solution because it will leak out of the bottle.
The mixture only works if you use it immediately, because the cleaning by products are active for only a short period of time.
**she also has before and after pics you can see those at http://www.inspired-housewife.com

This worked wonderfully! There were a few stains on my little ones mattress (we all know about accidents) and they are all gone!

My daughter had gotten sick one night and threw up in her bed, this took out the smell completely, but it did not remove the faint stain. But I consider it a win since the smell is gone.

Our cat had also been accidentally locked in her room for a few hours one day 😦 and peed in her bed, if you have ever had an indoor cat you know how potent that ammonia smell is and how hard it is to get rid of, we’ll this got rid of the smell! TOTAL AWSOMENESS!

I definitely recommend giving this solution a try!

Hope this helps you!

Don’t forget to do something to make someone smile today!

Until next time,
Love Jennifer.

One of My Favorite Things: Mason Jars

Hola! Jennifer here with a look at another of my favorite things:

Mason Jars!!

Seriously,I do not know how I lived so long without using them!

I use them for everything now. From holding lightening bugs, flowers, lotion, fabric softener, ketchup, salads to canning! I used them as center pieces for a baby shower, just added water pretty rocks and a floating candle. I have seen them used as center pieces at a wedding reception. And OH MY GOODNESS have you seen the different ideas on Pinterest! You can check out my board titled “Mason Jars” for some wonderful inspiration.

20130521-214548.jpg
This jar is holding my DIY all natural lotion.

20130522-231848.jpg
This one is holding flowers my daughter picked for me, so pretty on my windowsill.

20130522-232431.jpg
This one is holding homemade fabric softener.

20130522-232557.jpg
These are holding vinegar soaking in orange peels for DIY all natural cleaning.

20130522-232851.jpg
This one is holding my cornstarch.

20130522-233013.jpg
These are holding my first canning experience a strawberry/blackberry jam.

20130522-233207.jpg
This one is holding my all natural ketchup making attempt.

There are so many possibilities with mason jars! I can’t wait to make a soap/lotion dispenser, to try out some of the wonderful ideas on Pinterest, and to of course do some canning! I can hardly wait for my grapevine to make grapes so I can make all natural jelly!!

I ran across this picture on Facebook and I feel it really sums up my love of mason jars:

20130522-234712.jpg

So get you some jars and start having fun!!

Don’t forget to do something to make someone smile today!

Love,
Jennifer

Eye Makeup Remover-DIY

Hey y’all! Jess here with a beauty product DIY that is sure to save you time and best of all, money!

I came across a pin on Pinterest one day for a DIY eye makeup remover and instantly pinned it, with every good intention of making it the next time I ran out of my store-bought remover, which I certainly did! I scanned the list of ingredients, and to my surprise, there were only 3 ingredients listed! That’s way less than what’s in my store-bought remover, and as a bonus, I already had them on hand!
To make your own eye makeup remover, you’ll need 1 cup of water, 1 1/2 Tbs. baby shampoo (I used Johnson’s brand), and 1/8 tsp. of olive oil. Whisk together and pour into a medium-sized bottle or two. This recipe makes enough to refill my old remover bottle, and about half of a travel-sized bottle I bought. That’s definitely more quantity than you’d get at the store, and you can’t beat the price! A bottle of remover costs me about $5 to buy premade, but to make my own, about half as much. And I think it works great! It even cleans off my waterproof mascara easily.
For all you ladies who wear eye makeup daily like me, this DIY eye makeup remover is a like a dream…for your eyes and your pocketbook!

To see more beauty pinspirations, feel free to follow me on Pinterest!

Until next time!

DIY Days: VINEGAR: who knew?

Hola y’all! Jenn here with a DIY day.

So I titled this VINEGAR: who knew?…..well apparently everyone except me 😉

As I have shared with you I am trying to change my eating and drinking to more all natural….well that has progressed now to my lotion(which is a post for another day) and my household cleaners which is today’s topic.

I have a girlfriend who has talked to me about her love of vinegar for a long time, but I never gave it much thought. I Iike the smell of clean I get from the store bought cleaners and I like the convenience of them. Then one day I was cleaning my bathroom and I really began to think about all the chemicals I was breathing in, what my 4 yr old was breathing in, and worse what chemicals my family may be picking up from the kitchen counter! I then laughed, called my friend an informed her she broke me! Don’t worry she knows I love her 😉

I then immediately started pinning all sorts of natural cleaners and imagine my surprise to learn that all I needed was water, vinegar, and alcohol! WHAT! It’s that simple and cheap!! I was floored and so excited to tell people….that’s when I realized I was apparently the only one who didn’t know this already.

Today I want to share with you some of my favorites that work great! These cover windows, floors, bathrooms, and my granite counter tops!

The first is simple!

1 cup Vinegar
1 cup Water
-put in spray bottle and clean!
-use on hardwood floors(I have a Cedar spray mop so pour straight in and clean)
I use this to clean my granite counter tops, my bathroom counters, my toilets, the tile bathroom floor, and my hardwood floors (mine have a super shiny finish and this makes them shine)

The next is a DIY Windex.

1 cup Water
1 cup Rubbing Alcohol
1 tblsp Vinegar
-put all ingredients together in a spray bottle and be amazed!

I LOVE THIS! It works so wonderfully! You would never know by looking at my windows or mirrors that I use a DIY product! I also like the smell of this one-smells clean!

I have used this on my floors and it works great, but I did it by accident and I have not seen any cleaners using alcohol on hardwoods and I have not researched to see if it could mess up my finish. So not recommending it as a hardwood floor cleaner. (I Grabbed the wrong bottle and poured it into my spray mop.) Oops!

Really simple, cheap, and no worries about chemicals!! I can clean and not worry about what we are being exposed to. Love it! Makes Mommy Happy Happy Happy!!

Hope you enjoy! More to come on being more natural/going granola and how great/fun it is to live that way!!

Don’t forget to do something to make someone smile today!

Bye for now,
Jenn

DIY Day-DIY Febreeze FAIL

Hola all! Jenn here with another DIY day!!

Unfortunately this is a fail 😦

DIY Febreeze

I found this during one of my Pinterest journeys and it seemed so wonderful! It showed homemade Febreeze for only $0.15 a bottle. I tried it a week or so ago and I am not impressed.

Per this pin you add:
1/8 Cup of Fabric Softner
2 Tablespoons Baking Soda
Hot Tap Water ( it didn’t have measurement filled remainder of bottle after other ingredients)
I used my old Febreeze bottle

I tried this and it smells great, but I found that when you spray it, it leaves a film on wood, widows, DVD cases, books, hardwood floors, etc. Soooo you can only use it on fabric that is nowhere near any of the above listed things. Obviously that is not helpful. You are trying to make things smell nice and you end up with a film on things! It easily wipes off, but that just means more cleaning you add to yourself. BOO! I don’t have time for more cleaning, I want to play!

I also tried adding more water(after using some) thinking that would thin out the fabric softner more, but it still leaves the film.

If you have any suggestions please let me know…..but as far as I am concerned this was a fail 😦

Don’t forget to do something to make someone smile today 🙂

Bye for now lovelies!!

Jennifer D.

DIY Day- Flavored Butter

Hola! Jenn here!

I hope you are all doing great!

I wanted to share with you something delicious! FLAVORED BUTTER! (Well in our case margarine.) obviously my eating all natural has hit some roadblocks, but more on that another time.

I LOVE going to Texas Roadhouse and eating their cinnamon butter and rolls.
Lately, I had been wanting to try to make the cinnamon butter so finally one night I gave it a try and it was delicious!!

I simply got some butter out and put it in a bowl to soften a little, then once soft I added cinnamon sugar and stirred it up. I don’t have an exact measurement. I just added, stirred, tested, and then repeated if needed.

20130217-182909.jpg

20130217-182918.jpg

On a side note-this was not good on my homemade biscuits. I am not sure how it would be on store bought biscuits, but my hubby and I agreed it would be best on rolls. My sister recommended Sister Shurbert rolls, so I bought the store brand version and they were wonderful with the cinnamon butter 🙂

I also tried this with garlic powder to replicate the garlic butter that Dominoes uses on their pizza. It was good, but would be better if the butter was completely melted to liquid form so you could dip you pizza in it.

Hope you have enjoyed this and that you will also enjoy some wonderful flavored butter-even thought isn’t healthy 😉

Don’t forget to do someone nice for someone else today!

Love,
JD